
This post presents Reserva, an experimental open-source central bank digital currency (CDBC) based on SingleStore.
I chose SingleStore for this project for several reasons, the main ones being:
- Its ability to mix row store and column store tables in the same database gives you the ability to do hybrid transaction / analytical processing (HTAP)
- Its first class support for sharding makes it easy to scale horizontally and achieve extremely high transaction throughput
- Its nature as a multi model storage engine gives you the flexibility to store a variety of data types
First we will discuss Reserva's design decisions, then explain the technical implementation, and last show how to use Reserva and review its performance characteristics.
The code for this project is available in the following git repository:
https://github.com/calmitchell617/reserva
Reserva's design decisions
Reserva's design was influenced by the following documents / books on CBDCs:
- The Future of Money
- A High Performance Payment Processing System Designed For Central Bank Digital Currencies
- E-krona pilot Phase 2
- Progress of Research & Development of E-CNY in China
Particular attention was payed to Technical possibilities for a U.S. Central Bank Digital Currency, because it is an official document from the US government outlining what they believe to be the key technical decisions that should be taken into account when building a CBDC. Let's discuss a few of those big decisions.
Permissions
In my opinion, the most fundamental question when starting to build a CBDC is who will have access to the system. The US government has this to say about the topic:
A CBDC system could either be managed by a set of trusted entities ("permissioned") or by a network of system participants ("permissionless"), or some combination of the two. This design choice does not assume the use of distributed ledger technology, but rather focuses on the governance structure of the system regardless of the technology used. In environments without trusted entities, permissionless systems often trade efficiency or other design features to potentially permit transactions to settle without established counterparty trust relationships or trusted third parties. By contrast, we assume that a U.S. CBDC system will rely on one or more trusted entities, such as the Federal Reserve.
To simplify, they are acknowledging that a permissionless system has certain benefits that allow parties to make transactions without needing a trusted third party. However, they come right out and say that they think any US CBDC will have at least one trusted party (the Federal Reserve), and maybe many more. My best guess is that when policy makers eventually decide to move forward with creating a CBDC, they will probably establish a system where certain vetted third parties (probably commercial banks) can access the system and other participants access the network through those pre-vetted players.
Because of this, Reserva's data model in SingleStore assumes commercial banks will be the users of the system, who would provision access to the network by developing their own front end client applications.
User Interface
Reserva's interface to the rest of the world is a JSON API with role based access control (RBAC). I have aspirations to build an internal admin UI, but for now, administration is also done through the API. As stated before, commercial banks would be the users of the system, who will have expertise developing against such APIs. They will have the following routes to work with:
// Banks
POST   /v1/banks
GET    /v1/banks/:username

// Accounts
POST   /v1/accounts
GET    /v1/accounts/:id
PATCH  /v1/accounts/frozen
PATCH  /v1/accounts/metadata
PATCH  /v1/accounts/change_money_supply

// Transfers
POST   /v1/transfers

// Authentication
POST   /v1/tokens/authentication

// Utility
GET    /v1/healthcheck
These routes are documented in the git repo's README.
Authentication / Authorization
There are many ways to perform request authentication when building an API, the ones I considered included:
- Stateful authentication tokens
- HTTP basic auth
- Stateless authentication tokens
- API key
- OAuth / OpenID Connect
At the end of the day, there is no right or wrong decision here, but I chose to go with stateful authentication tokens. The reason I chose this method over each alternative is:
- HTTP basic auth and stateless authentication tokens can be taxing, performance wise. This will have to be a high performance system, so that rules out these approaches.
- API keys are quite similar to stateless authentication tokens, but tend to be stored in the user table, as opposed to a separate token table. It wouldn't be hard to argue that Reserva is using short-lived API keys from the point of the user, so let's not dwell on the differences.
- OAuth would mean that another party influences our API's authentication, which I don't want.
Therefore, with the exceptions of /v1/tokens/authentication and /v1/healthcheck, require stateful authentication via a bearer token. In the real world, that means you need to pass a header with every request that looks like this:
Authorization: Bearer <auth_token_goes_here>If you want to see a few example curl commands, they are available in this file of the repo. Here is one example, creating a bank:
curl -H 'Authorization: Bearer <my_auth_token>' -d '{"username": "myBankUsername", "admin": false, "password": "Mypass123"}' localhost/v1/banksTechnical implementation
Reserva is a Go web application built on top of SingleStore and Redis. SingleStore can actually handle any in-memory caching that Redis can, but I am comfortable with a particular pattern for using Redis' key-value data model for an authentication cache, and decided to stick with it for now.
The application itself is stateless, and designed to be easy to run in containers or on a VM behind a load balancer for horizontal scalability. The ideal architecture would look something like this:
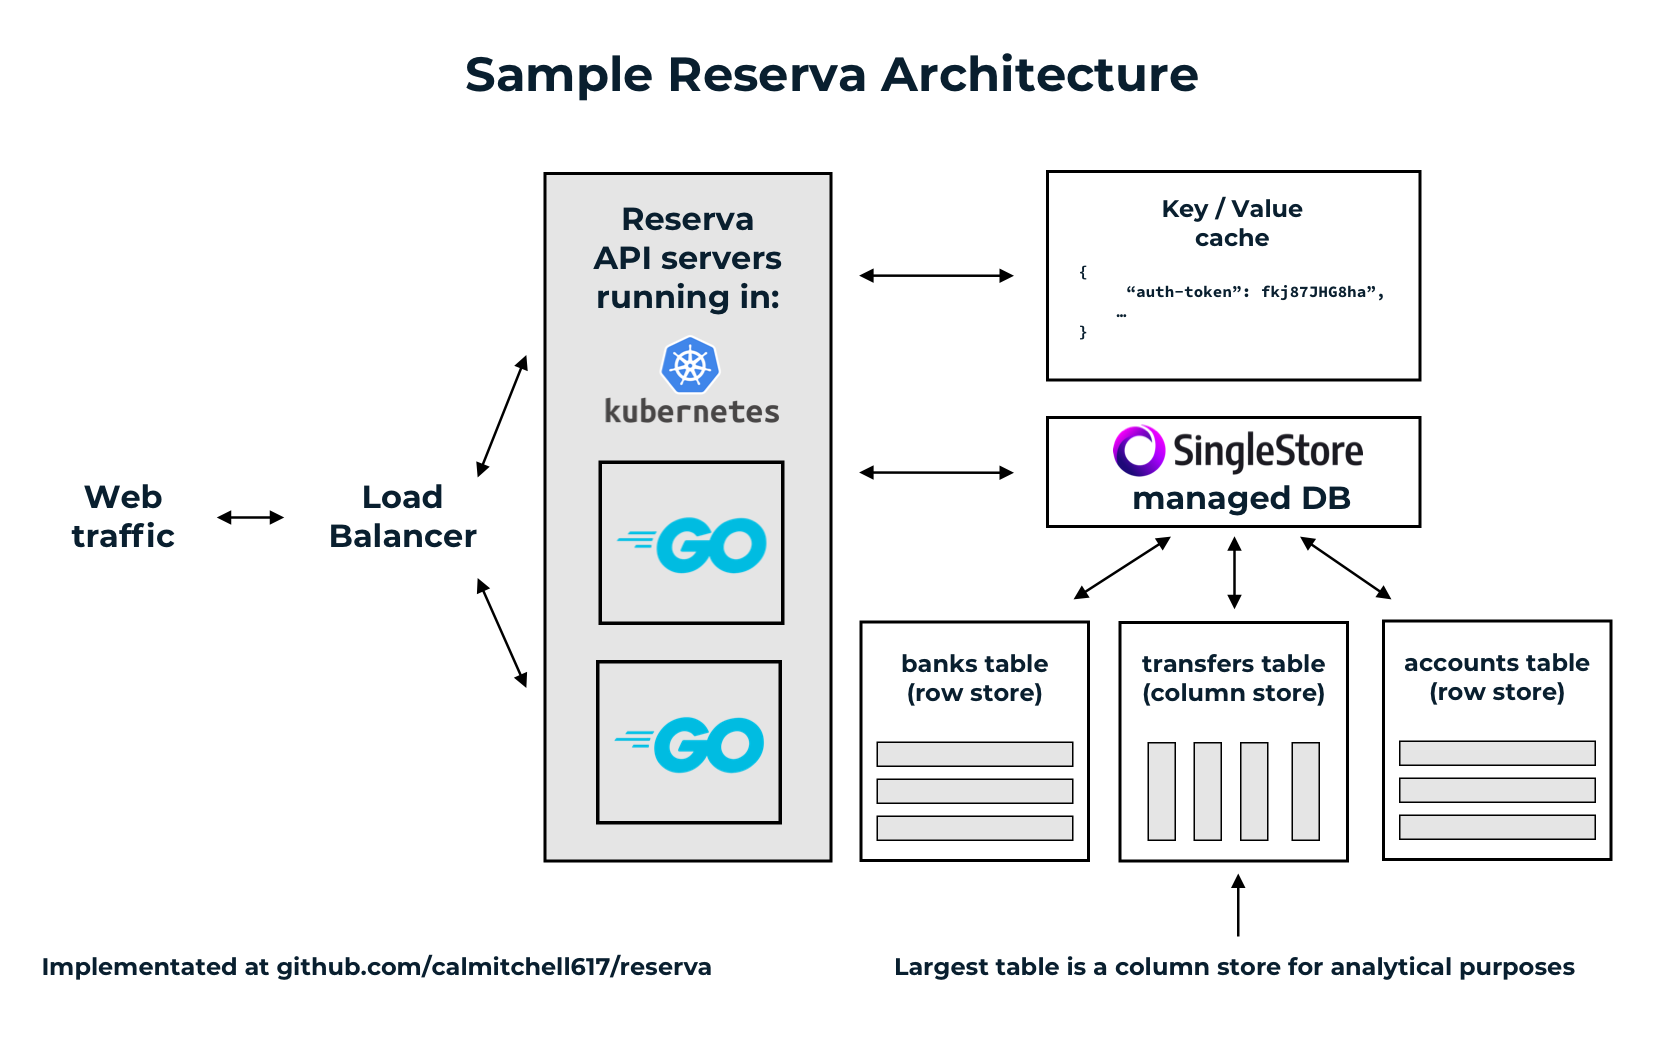
Data model
And now it's time for the fun stuff! SingleStore has excellent documentation on designing a schema to maximize performance. We will follow their advice.
Rowstore vs columnstore
From SingleStore's docs:
Rowstore tables are good for seeks and concurrent updates. They keep all the data in memory and all the columns for a given row together, resulting in very fast performance when running queries that seek to specific rows. With rowstore, data is stored in lock-free indexes for great performance at high concurrency. Rowstore tables can use multiple indexes, allowing them to flexibly support many types of queries. Transactional style OLTP workloads with frequent updates are a good fit for rowstore tables.
Columnstore tables are good for sequential scans. Data is stored on disk by column, resulting in good data compression and exceptional performance when running queries that perform sequential scans and touch relatively few columns.
What they are saying here is a well known distinction: tables stored in a row-fashion are great for OLTP workloads, while column stores are better for OLAP (analytical) work. What's so fascinating about SingleStore is that you can actualy mix these two paradigms together in the same schema, allowing you deliver an HTAP workload.
The SQL used to generate Reserva's data model looks like this:
create rowstore table banks (
  username varchar(32) primary key,
  admin bool not null,
  password_hash varbinary(64) not null,
  frozen bool not null default false,
  version bigint unsigned not null default 0,
  shard key (username)
);

create rowstore table accounts (
  id bigint unsigned auto_increment,
  controlling_bank varchar(32) not null,
  metadata json not null,
  frozen boolean not null default false,
  version bigint not null default 0,
  primary key (id, controlling_bank),
  shard key (controlling_bank)
);

create columnstore table transfers (
  id bigint auto_increment not null,
  source_account_id bigint not null,
  target_account_id bigint not null,
  created_at datetime not null default now(),
  amount_in_cents bigint not null,
  primary key (id, source_account_id),
  shard key (source_account_id)
);
Notice that the accounts and banks tables are rowstores, while the transfers table is a columnstore. Normally, this wouldn't be viable, since the transfers table is our fact table, which usually needs to be a rowstore for frequent inserts. However, SingleStore has a unique feature where it keeps a small rowstore table available to cache inserts into a columnstore table. This caching allows it to deliver OLTP performance for inserts, and OLAP performance while running analytical queries - a very compelling value proposition. From their docs:
Inserts to SingleStore columnstore tables are initially inserted into an internal rowstore table to be quickly written without the cost of disk I/O.
Sharding
A key concept behind SingleStore's unique performance characteristics is its ability to shard tables by a given key. From SingleStore's docs:
The second consideration when putting data into SingleStoreDB Cloud is choosing the shard key for a table. Data is distributed across the SingleStoreDB Cloud workspace into a number of partitions on the leaf nodes. The shard key is a collection of the columns in a table that are used to control how the rows of that table are distributed. To determine the partition responsible for a given row, SingleStoreDB Cloud computes a hash from all the columns in the shard key to the partition ID. Therefore, rows with the same shard key will reside on the same partition.
This means that rows will be distributed by the shard key - in Reserva's case, the most important table (and the one with the most data) is the transfers table, which is distributed by the source_account_id. This means that all transfers initiated by a given account will be stored on one node. Combined this sharding strategy with the fact that account balances are computed and stored in the cache, not on disk, and that means that transfers are single-node transactions, and so write performance should scale linearly with the amount of nodes on the system.
Caching
A sharded money transfer database schema typically requires touching two nodes to insert a transfer - it will need to write the transfer itself, and update the source and target account balances. Usually the transfer record can be stored on the same node as the source account, but this does not mean that the target account will be stored on the same node.
To alleviate this, I moved the account balance from the database to the cache - this means that the only thing that needs to be written to disk is the transfer itself. Now, if the cache goes down, this means that the balances will have to be re-computed. I have not written this crash recovery logic yet, but it would just require adding up all money supply changes, as well as transfers, to compute the final account balances.
The authentication tokens are also stored in the cache - this is OK because if the cache goes down, the user can always exchange their username and password for a new token.
Demonstration / performance review
Now it's time to actually use Reserva. You will need the following things to follow along.
- A SingleStore license
- Docker and Docker Compose
Docker and Docker Compose are easy to install - here are installation instructions if you don't already have them.
To get a SingleStore license, go to the SingleStore portal, click on the organization dropdown on the left, and then select Self-Managed Licenses.
Environment setup
First, get the repository and open it in your favorite text editor.
git clone https://github.com/calmitchell617/reserva.git
Now, create a file called .envrc in the top level of the repository. This is where we will put the SingleStore license, as well as a few other pieces of information.
touch .envrc
And put the following information in that file, then save it:
export SINGLESTORE_LICENSE=<paste_here>
export SINGLESTORE_PASSWORD=Mypass123export
DB_DSN=root:Mypass123@tcp(singlestore:3306)/reserva?parseTime=true
Last, you need to load those values into environment variables by running the following command:
source .envrc
Start the services
Run the following command to run SingleStore, Redis, and Reserva. Note that the first docker-compose down command isn't nessecary, but I run it that way so that the command is idempotent.
docker-compose down -v && docker-compose up --build -d && docker-compose logs -f
Wait for the services to start, it will take a minute.
Create the DB schema
Go to localhost:8080 in your web browser, and login with the credentials:
- Username: root
- Password: Mypass123
Next, go to the SQL editor and run the command:
create database reservaNext, change your selected DB to reserva, you may have to navigate to another page and come back for the list to refresh.
Then, copy and paste in the following SQL:
create rowstore table banks (
  username varchar(32) primary key,
  admin bool not null,
  password_hash varbinary(64) not null,
  frozen bool not null default false,
  version bigint unsigned not null default 0,
  shard key (username)
);

create rowstore table accounts (
  id bigint unsigned auto_increment,
  controlling_bank varchar(32) not null,
  metadata json not null,
  frozen boolean not null default false,
  version bigint not null default 0,
  primary key (id, controlling_bank),
  shard key (controlling_bank)
);

create columnstore table transfers (
  id bigint auto_increment not null,
  source_account_id bigint not null,
  target_account_id bigint not null,
  created_at datetime not null default now(),
  amount_in_cents bigint not null,
  primary key (id, source_account_id),
  shard key (source_account_id)
);
Create central bank with admin permissions
Now we have to create an initial bank with admin permissions. You can do that with the following command:
docker exec -it reserva_api addBank -db-dsn=${DB_DSN} -cache-host=cache -cache-port=6379 -bank-username="adminBank" -bank-password="Mypass123" -bank-admin=trueStart the API
Now we are finally ready to start the API and send some commands. Start the API with the following command:
docker exec -it reserva_api api -port 80 -db-dsn=${DB_DSN} -cache-host=cache -cache-port=6379
We can now take a short tour of the API. First let's get an authentication token for our admin bank. Open a new terminal window and run the following command:
curl -d '{"username": "adminBank", "password": "Mypass123"}' http://localhost/v1/tokens/authentication
Next, let's create a non-admin bank. This would be the kind of bank that you're used to dealing with - a commercial bank.
curl -H 'Authorization: Bearer <admin_auth_token_goes_here>' -d '{"username": "typicalBank", "admin": false, "password": "Mypass123"}' localhost/v1/banks
And now we can get an authentication token for this commercial bank:
curl -d '{"username": "typicalBank", "password": "Mypass123"}' localhost/v1/tokens/authentication
We can now create a few accounts. These are the places that you or I would have money in.
Note that a given account is only able to be accessed by it's controlling bank, which is the bank that opened it. So, in this case, because we are opening the account using "typicalBank"'s auth token, typicalBank will be the only one who can initiate transfers from it, other than the central bank.
curl -H 'Authorization: Bearer <typicalBanks_auth_token>' -d '{"metadata": "{\"1\": 4}"}' localhost/v1/accounts
You may notice the metadata field and think "what is that?" Well, that is a JSON field that can accept anything, really. I imagine that banks would use it to store KYC data or any other identifiers that they want.
Now let's add some money to an account. Changing an account's balance without a corresponding transfer actually alters the total available money supply, so this route is only available to the central admin bank. So, send the following command with the admin token in the header.
curl -H 'Authorization: Bearer <admin_auth_token>' -X PATCH -d '{"id": 1, "change_in_cents": 450}' localhost/v1/accounts/change_money_supply
And now, finally, we can transfer some money between the accounts we created.
curl -H 'Authorization: Bearer <typicalBanks_auth_token>' -d '{"source_account_id": 1, "target_account_id": 2, "amount_in_cents": 100}' http://localhost/v1/transfers
Load test the application
Wow! That was a lot of information, and it's cool to see things working. But let's get to the question we all want to know the answer to: How fast can it go?
Well, eagle-eyed observers may have noticed a container called reserva_load_tester in the Compose file. This is an application that spawns a bunch of requests to create banks, accounts, and transfers. You can alter some of the parameters used to load test the account. Run the program with this command:
This load testing program expects an empty database, with the exception of a single bank user, called adminBank. We already created that bank in a previous step, so this should "just work".
docker exec -it reserva_load_tester loadTest -host="http://reserva_api" -concurrency=100 -num-transfers=100000
If you get any errors, try running the schema creation SQL in the SingleStore dashboard again, followed by the addBank command.
While it's running check out your system's resource usage. SingleStore, Redis, and Reserva are all quite good at saturating CPU cores, so I'll bet your CPU is working real hard!
Running everything on my laptop (a Macbook Air) gets over 2,000 transfers per second... That is excellent performance for such modest hardware.
Run some HTAP queries
It will take a few minutes for the load test above to complete. Let's take advantage of that time to run some analytical queries.
Open up SingleStore's dashboard, and let's do some basic analytical select queries.
select source_account_id, count(*) from transfers group by source_account_id order by count(*) desc
Notice how the database is able to continue serving the OLTP traffic while running high performance analytical queries - a very cool combination.
Conclusions
Reserva is able to run a high performance central bank digital currency with multi-model data types, HTAP abilities, and is horizontally scalable. With some more work, I think this prototype CBDC, and others like it, have the potential to actually complement paper currency in the medium term future